i18nによる日本語化対応
i18nとは
(internationalization)国際化のこと。
i18nの実装方法
Gemfile
gem 'rails-i18n'
config/application.rb
config.i18n.default_locale = :ja # デフォルトのロケールを設定
config.i18n.load_path += Dir[Rails.root.join('config', 'locales', '**', '*.{rb,yml}').to_s]
この設定を行うことによってモデルやビュー単位でi18nの定義ファイルを分けることができる。
次に日本語化するファイルをモデルとビューで分けて記述する。
config/locales/views/ja.yml
ja:
   defaults:
     login: 'ログイン'
     register: '登録'
     logout: 'ログアウト'
     message:
      require_login: 'ログインしてください'
   users:
     new:
       title: 'ユーザー登録'
       to_login_page: 'ログインページへ'
     create:
       success: 'ユーザー登録が完了しました'
       fail: 'ユーザー登録に失敗しました'
   boards:
     index:
       title: '掲示板一覧'
       no_result: '掲示板がありません。'
     new:
       title: '掲示板作成'
このようにlazy lookup記法を使用すると
例えば app/views/users/new.html.erb ビューテンプレート内部で、例えばタイトルを表示させたい場合users.new.title のようにアクセスできる。
app/views/users/new.html.erb
<%= t '.title' %> # => ユーザー登録
コントローラーごとに分けて記述しておくことによって、ビュー側では以下のような簡単な記述になるので見やすくなる。 config/locales/activerecord/ja.yml
ja:
   activerecord:
     models:
       user: 'ユーザー'
       board: '掲示板'
       comment: 'コメント'
       bookmark: 'ブックマーク'
     attributes:
       user:
         id: 'ID'
         email: 'メールアドレス'
         password: 'パスワード'
         password_confirmation: 'パスワード確認'
         last_name: '姓'
         first_name: '名'
       board:
         id: 'ID'
         title: 'タイトル'
         body: '本文'
         board_image: 'サムネイル'
         created_at: '作成日時'
         user: '作成者'
   enums:
     user:
       role:
         admin: '管理者'
         general: '一般'
フォームでの適応
Railsを使っている場合フォームを記述際にform_withを使う場合が多くある。
form_withの場合少し特殊なので注意⚠️!!
以下の2種類で書き方が変わる。
- モデルに紐づくフォームの場合
- ログイン処理などのようにモデルに紐づかないフォーム
1. モデルに紐づくフォームの場合
 <%= form_with model: @user, local: true do |f| %>
   <div class="form-group">
     <%= f.label :last_name %>
     <%= f.label :password_confirmation %>
     <%= f.password_field :password_confirmation, class: 'form-control' %>
   </div>
     <%= f.submit (t 'defaults.register'), class: 'btn btn-primary' %>
 <% end %>
Railsが勝手に翻訳してくれるため、わざわざ記述する必要がない。
2. モデルに紐づかないフォームの場合
<%= form_with url: login_path, local: true do |f| %>
  <div class="form-group">
    <%= f.label :email, User.human_attribute_name(:email) %>
    <%= f.text_field :email, class: 'form-control' %>
  </div>
  <div class="form-group">
    <%= f.label :password, User.human_attribute_name(:password) %>
    <%= f.password_field :password, class: 'form-control' %>
  </div>
  <div class="actions">
    <%= f.submit (t 'defaults.login'), class: 'btn btn-primary' %>
<% end %>
Model.model_name.humanメソッドと Model.human_attribute_name(attribute)メソッドを使うことで、モデル名と属性名を透過的に参照できるようになる。
例えばconfig/locales/activerecord/ja.ymlが以下のような場合、下のような表示結果になる。
ja:
   activerecord:
     models:
       user: 'ユーザー'
       board: '掲示板'
       comment: 'コメント'
       bookmark: 'ブックマーク'
     attributes:
       user:
         id: 'ID'
         email: 'メールアドレス'
         password: 'パスワード'
         password_confirmation: 'パスワード確認'
         last_name: '姓'
         first_name: '名'
User.model_name.human  =>  ユーザー
User.human_attribute_name("email")  =>  メールアドレス
参考
Gitってなにもの?
gitとは
ファイルのバージョンを管理するためのもの
gitのリポジトリとは
ファイルやディレクトリの変更や状態を記録する場所のこと。
Gitのリポジトリにはローカルリポジトリ、リモートリポジトリの2種類がある。
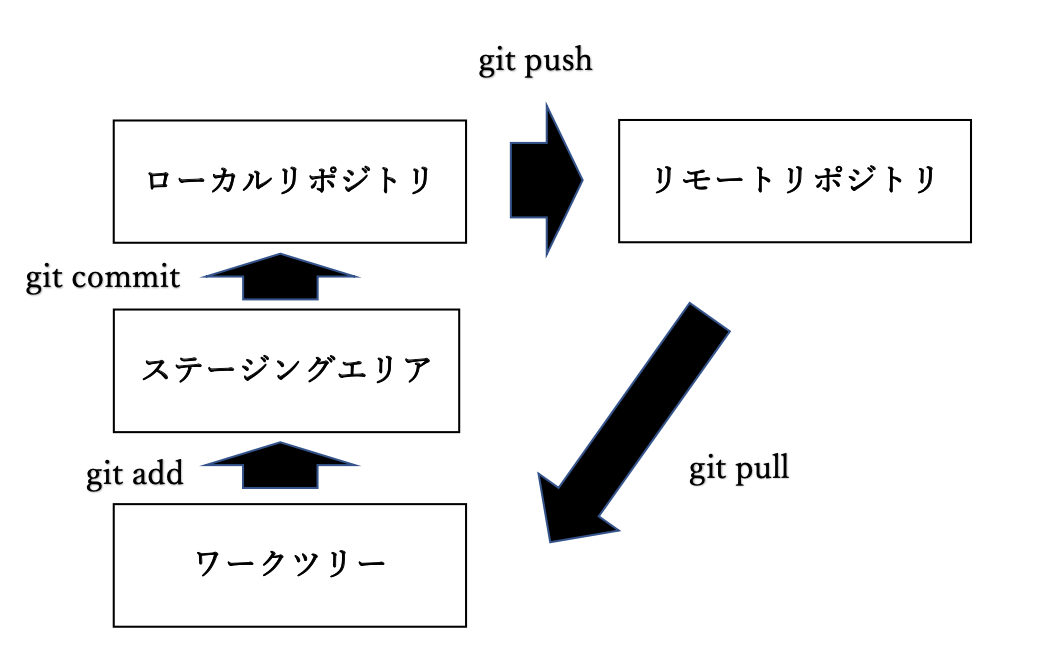
Gitの流れ
Gitはいきなりローカルリポジトリやリモートリポジトリに変更を記録するのではなく、以下のような手順をおこなう。
Gitコマンド
1. git init
$ git init
git initコマンドで.gitディレクトリが作成され、この.gitディレクトリに変更履歴を記録する。
2. git add
$ git add "ファイル名"
ファイル名を指定してステージングエリアへ追加する。
3. git commit
$ git commit -m "メッセージ"
メッセージを付け加えてローカルリポジトリに変更を記録する。
$ git commit --amend
直前のコミットを修正できる。
※リモートリポジトリにpushをしたコミットには絶対このコマンドつかってはいけない。
4.git status
$ git status
変更したファイルを表示する
5. git diff
$ git diff
ワークツリーとステージングエリアの変更の差異を確認する。
$ git diff --staged
ステージングエリアとリポジトリの変更差異を確認する。
6. git log
$ git log
変更履歴を確認する
変更内容をみたい場合は後ろに-pをつけ、終了するときはQキーをおす。
7. git push
$ git push origin master
あらかじめ$ git remote add origin (GitHubなどのURL)によって登録しておくことで簡単にリモートリポジトリへpushできる。
8. git pull
$ git pull origin master
リモートからファイルをダウンロードすることができる。
9. git checkout
$ git checkout --"ディレクトリ名orファイル名"
このコマンドはステージングエリアに記録された情報をもとにファイルの変更を取り消すことができる。
10. git reset
$ git reset HEAD "ファイル名orディレクトリ名"
リモートリポジトリに記録された情報をもとにステージングエリアの変更情報を取り消す。
ステージングエリアの情報を取り消すだけなので、$ git checkoutしなければワークツリーの情報はかき変わらない。
Gitにコミットさせない方法
パスワードが記録されているファイルや自動生成された変更を記録する必要のないファイルは.gitignoreファイルを作成して、そこにバージョン管理をしたくないファイルを転記することで、バージョン管理がされなくなる。